
Searching for “pictures of spider bites” usually means you’ve found an unexplained skin lesion and you’re concerned. Let me be direct: most skin sores people assume are spider bites actually aren’t. As someone who has researched this extensively and consulted with dermatology resources, I must emphasize that accurate identification requires medical expertise, not just image comparison.
This guide will show you medically-verified pictures while arming you with the critical knowledge to understand their limitations and know when to seek immediate care. My goal is to provide responsible information that prioritizes your health over speculation.
Table of Contents
Critical Disclaimer: Why Pictures Can Be Misleading
Before we look at any images, you must understand these key points:
-
Most “Spider Bites” Are Something Else: Studies show that over 80% of suspected spider bites diagnosed in clinics are actually other conditions—commonly bacterial infections (like MRSA), other insect bites, or skin conditions.
-
Spiders Rarely Bite Humans: Spiders are not aggressive toward humans and typically bite only when trapped against skin.
-
You Rarely See the Spider: In true spider bites, the spider is usually felt or seen during the incident.
-
Symptoms Evolve: What a bite looks like changes over hours and days, making single images insufficient for diagnosis.
-
Individual Reactions Vary: The same spider can cause dramatically different reactions in different people based on immune response.
The Only Reliable Diagnosis comes from a healthcare professional who can examine the lesion in person, consider your full history, and rule out more common and dangerous conditions.
Medically-Confirmed Spider Bites: What They Actually Look Like
Here are characteristics of bites from spiders that are medically significant in North America. These images should be used for educational reference only, not self-diagnosis.
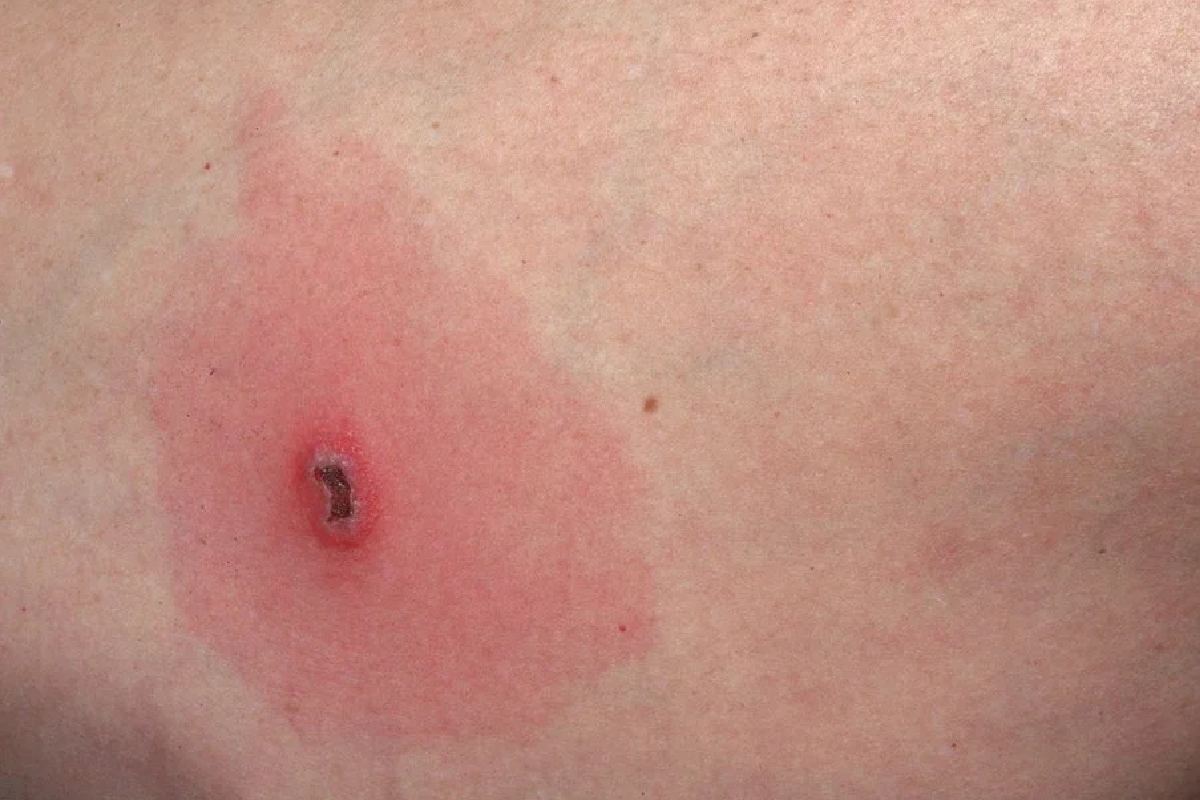
1. Brown Recluse Spider Bite (Loxosceles reclusa)
These images would show progressive changes over days to weeks.
Initial Appearance (First 2-8 hours):
-
Often painless or mild stinging initially
-
Small red bump, similar to many insect bites
-
May develop a tiny blister or central pale area
Progression (24-72 hours):
-
Increasing pain, redness, and swelling
-
Development of a “bullseye” pattern (red outer ring, pale middle, dark center)
-
The center may become dark blue or purple as tissue damage occurs
Advanced Stage (3 days to weeks):
-
Formation of an ulcer or necrotic (dying) tissue
-
Lesion may expand significantly
-
Possible fever, chills, or body aches
Key Identifying Feature: The violin-shaped marking is on the spider’s back, NOT on the bite. You need to see the actual spider for this identification.
2. Black Widow Spider Bite (Latrodectus species)
The bite mark itself is often unremarkable; systemic symptoms are the main concern.
Local Reaction:
-
May appear as tiny twin puncture marks (fang marks)
-
Immediate sharp pain or sometimes minimal initial sensation
-
Mild redness and swelling around the site
Systemic Symptoms (30 minutes to several hours later):
-
Severe muscle cramps and rigidity (especially abdomen, shoulders, back)
-
Sweating, nausea, vomiting
-
Headache, anxiety, elevated blood pressure
-
These systemic symptoms are more telling than the skin appearance
Important Note: The “red hourglass” is on the spider’s underside, not the bite.
3. Common Non-Dangerous Spider Bites
Most spider bites resemble other minor insect bites:
-
Single or clustered small red bumps
-
Mild itching or discomfort
-
Localized redness less than 1 inch diameter
-
Symptoms resolve within a few days
What Spider Bites Do NOT Typically Look Like
Understanding what usually isn’t a spider bite is equally important. These patterns should make you consider other causes:
Not Typical of Spider Bites:
-
Pus-filled boils or large abscesses → More likely bacterial infection (MRSA)
-
Rash spreading from a central point → Consider Lyme disease (tick bite) or cellulitis
-
Multiple bites in a line or cluster → More likely bed bugs, fleas, or mosquitoes
-
Blisters filled with clear fluid → Could be poison ivy, shingles, or other causes
-
Rapidly expanding redness within hours → Suspect cellulitis (bacterial infection)
The Dangers of Misidentification: Conditions Commonly Confused with Spider Bites
| Actual Condition | Why It’s Confused | Key Distinguishing Feature |
|---|---|---|
| MRSA Skin Infection | Forms painful, swollen, pus-filled bumps | Often has a central “head” of pus; may drain; fever common |
| Cellulitis | Red, warm, spreading skin area | Spreads rapidly; often from minor skin break; systemic symptoms |
| Lyme Disease (Bullseye Rash) | Has concentric ring appearance | Rash expands slowly over days; often >2 inches; flu-like symptoms |
| Shingles | Blistering, painful rash | Follows nerve pathways; appears in band or patch; preceded by pain |
| Poison Ivy/Oak | Blisters, redness, intense itching | Linear pattern from plant contact; extremely itchy; not painful |
When to Seek Immediate Medical Attention
Go to an Urgent Care Clinic or Emergency Room if you have:
-
Systemic Symptoms: Fever, chills, nausea, muscle cramps, or headache
-
Severe or Spreading Pain: Pain that intensifies or spreads from the bite site
-
Rapidly Changing Lesion: Skin that’s darkening, blistering, or ulcerating quickly
-
Signs of Infection: Increasing redness, warmth, swelling, or pus
-
Difficulty Breathing: Any respiratory symptoms after a suspected bite
-
Known High-Risk Spider: You saw and identified a black widow or brown recluse
-
Compromised Health: If you have diabetes, immune issues, or chronic illness
What to Do If You Suspect a Spider Bite: Step-by-Step Protocol
Step 1: Immediate Care
-
Wash the area gently with soap and water
-
Apply a cool compress to reduce swelling
-
Elevate the affected limb if possible
-
Do NOT apply tourniquets, cut the wound, or attempt to suck out venom
Step 2: Documentation
-
Take clear, well-lit photos against a ruler or coin for scale
-
Note the time and any symptoms
-
Circle the outer edge of redness with a pen to track spread
Step 3: Capture the Spider (If Possible and Safe)
-
Place a clear container over it, slide paper underneath
-
Preserve in rubbing alcohol if you can do so safely
-
Never handle potentially dangerous spiders with bare hands
Step 4: Medical Consultation
-
Call your doctor, use telemedicine, or visit urgent care
-
Show your photos and describe exactly what happened
-
Mention if you captured the spider
Prevention: The Best “Treatment” for Spider Bites
Since true spider bites are rare, prevention focuses on reducing encounters:
-
Seal Entry Points: Check windows, doors, and foundations for gaps
-
Reduce Clutter: Spiders hide in undisturbed areas like boxes, clothing piles, and woodpiles
-
Wear Protection: Use gloves when handling stored items or working outdoors
-
Shake Out Items: Shoes, towels, and clothing that have been on the floor or in storage
-
Use Caution at Night: Spiders are often more active after dark
The Responsible Approach to Spider Bite Identification
After years of researching this topic and consulting medical literature, my strongest recommendation is this:
Use pictures for general education, not for self-diagnosis. The similarities between various skin conditions are too great for accurate visual identification by non-professionals. What matters most isn’t matching a picture, but recognizing concerning symptoms that require medical evaluation.
If you’re worried enough to search for pictures, you’re worried enough to:
-
Take clear photos of your lesion
-
Monitor closely for warning signs
-
Contact a healthcare provider for proper assessment
Your health deserves more than internet image matching. It deserves professional medical evaluation when you have concerning symptoms.